The Structure Class
Note
This is the longest section of all our getting-started guides -- but take your time here and don't skip anything. Understanding the toolkit Structure class is essential when using Simmate.
Intro to Python Classes
In Python, a class is like a blueprint that defines how something should be created.
Let's say you want to describe a car. The class would define what a car is – what attributes it has (like color, model, and speed) and what it can do (like drive or honk). Once you have this blueprint, you can create specific cars (objects) based on it. Each car you create is a unique instance of the class with its own characteristics. So, a class is like a template that helps you organize and create objects in your code.
This becomes incredibly powerful when we start building out functionality and analyses.
Example
Consider these analogies:
- lions, tigers, and bears are examples of animals. In Python, we could say that
lion,tiger, andbearare objects of the classAnimal. - McDonald's, Burger King, and Wendy's are examples of restaurants. In Python, we could say that
mcdonalds,burgerking, andwendysare objects of the classRestaurant.
The Structure class
In materials science, the most commonly used class is for crystal structures. In Simmate, this class is called Structure.
A crystal structure always consists of a lattice and a list of atomic sites. This is exactly what we have in our POSCAR file from tutorial 3.
Let's use Simmate to create an object of the Structure. Enter this line into the Python console:
from simmate.toolkit import Structure
This line loads the Structure class from Simmate's code it now ready to be used.
Summary of Steps
Once we have our Structure class loaded & ready to help, analyzing a structure usually involves the following steps:
- Loading a structure into Python
- Cleaning up & modifying the structure as needed
- Analyzing the structure's properties and features
- Exporting the structure in a different format
While only the first step is mandatory, the rest are optional and can be customized according to your needs.
Basic Example
Here's a script that covers each of the steps mentioned above:
from simmate.toolkit import Structure

# 1: Import
structure = Structure.from_file("POSCAR")

# 2: Clean / Modify
structure = structure.get_primitive_structure()

# 3: Analyze
print(f"Density: {structure.density}")

# 4: Export
structure.to(filename="output.cif", fmt="cif")
In the steps below, we will walk through how to build your own script.
1. Load
Now, we will tell Python that we have a Structure and its information is located in the POSCAR file:
nacl_structure = Structure.from_file("POSCAR")
Warning
Before loading a structure, ensure you have the correct working directory (as we did with the command-line). Spyder displays this in the top right, and you can change it by clicking the folder icon. We want to be in the same folder as our POSCAR file.
To view the structure you just loaded:
print(nacl_structure)
Tip
There are MANY other ways to load structures, such as from different file formats or even python directly. To explore the different loading options, refer to our full guides.
For example, you can create a structure directly in python:
from simmate.toolkit import Structure

structure = Structure(
    lattice=[
        [3.48543651, 0.0, 2.01231771],
        [1.16181217, 3.28610106, 2.01231771],
        [0.0, 0.0, 4.02463542],
    ],
    species=["Na", "Cl"],
    coords=[
        [0.0000, 0.0000, 0.0000],
        [0.5000, 0.5000, 0.5000],
    ],
)
2. Clean & Modify
With our structure loaded, we can now learn the importance of the Structure class. A Structure object will have properties and methods available to help us perform common tasks and calculations. A property is a characteristic of an object (such as density or volume), where a method performs a specific task using optional parameters (such as symmetry analysis).
Let's first learn about methods by cleaning our structure. We will converting it to the primitive unitcell and then create a 2x2x2 supercell.
i: Symmetry reduction
The get_primitive_structure() method can convert a conventional unit cell into a primitive unit cell:
nacl_structure.get_primitive_structure()
This command will display a new structure, which should match the primitive structure we already have. You can also store the result in a new Structure object. For example:
nacl_prim = nacl_structure.get_primitive_structure()
All methods end with parentheses (), which allow you to modify the method using optional input parameters. For example, the get_primitive_structure() method uses symmetry in its calculations, and you can adjust the tolerance for symmetry with:
nacl_structure.get_primitive_structure(tolerance=0.1)
This command will identify atoms as symmetrically identical if they are nearly in their 'symmetrically correct' positions (within 0.1 Angstrom). If you don't specify a tolerance, the method will use a default value.
ii: Creating Supercells
Some methods, require an input parameters. This includes the make_supercell method wich must be given the supercell size that you want it to make:
nacl_structure.make_supercell([2,2,2])
Tip
See our Tips & Tricks section below for viewing all available Structure methods
3. Analyze
In step 2, we mentioned "properties" but did not show examples. We will use properties (and a few more methods) to analyze our structure.
Basic properties:
Properties are essentially fixed formulas that we can follow. For instance, all structures possess a density property, which can be computed once the lattice and atomic sites are known. The formula for this calculation remains constant, allowing for automation.
Unlike methods, however, there are no optional parameters for properties. Therefore, we do not need () at the end of them. Try accessing some:
nacl_structure.density
nacl_structure.num_sites
nacl_structure.frac_coords
nacl_structure.cart_coords
Advanced properties: Now, what if we want a bunch of properties relating to lattice such as volume, angles, and vectors?
For better organization, the Structure class includes an associated class called Lattice. Within the lattice object, properties like volume, angles, vectors can be found. In other words, our Structure class is made up of smaller class objects like Lattice, PeriodicSite, and Composition that help us further organize properties and methods.
Try accessing the lattice and composition properties (run one line at a time):
# Lattice properties
nacl_structure.lattice.volume
nacl_structure.lattice.matrix
nacl_structure.lattice.beta

# Compostion properties
nacl_structure.composition.reduced_formula
nacl_structure.composition.elements
Tip
See our Tips & Tricks section below for viewing all available Structure properties
Tip
For convenience, you can use a shortcut. Save the Lattice object to a new variable name (here, it's l, but you can choose a different name) and then call its properties:
l = nacl_structure.lattice
l.volume
l.matrix
l.beta
4. Export
Moving your structure from Python and back into a file will be our easiest step. There are a variety of formats available (CIF, POSCAR, QE, ...) which listed out in the full guides:
structure.to(filename="output.cif", fmt="cif")
Extra Tips & Tricks
Viewing python variables
As you create new python objects and assign them different names, you'll need a way to keep track of them. Spyder's variable explorer (located in the top right window tab) can help with this. Try double-clicking on some of your variables to explore what Spyder can do:

Finding methods & properties
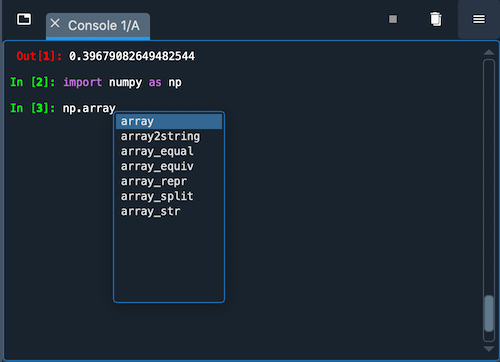
To see all the available properties and methods, type nacl_structure (or whatever your variable name is) into the terminal, add a dot (.), and then press tab. A list of options will appear.
You can also explore the properties and methods of other classes, such as lattice, using the same method. The list should look something like this (note, this image uses numpy as an example):
Running Python Structures in Workflows
Structure objects can be used to run a workflow. We did this with the command-line in the last tutorial but can accomplish the same thing with Python:
from simmate.toolkit import Structure
from simmate.workflows.utils import get_workflow

workflow = get_workflow("static-energy.quantum-espresso.quality00")
nacl = Structure.from_file("POSCAR")
result = workflow.run(structure=nacl)
Note
As you get more confortable with Python, you'll learn that almost everything is a class or object. In fact,
the workflow we just ran uses a Workflow class!
Tip
As a shortcut, we could have just given the filename to our workflow:
from simmate.workflows.utils import get_workflow

workflow = get_workflow("static-energy.quantum-espresso.quality00")
result = workflow.run(structure="POSCAR")
workflow_name: static-energy.quantum-espresso.quality00
structure: POSCAR